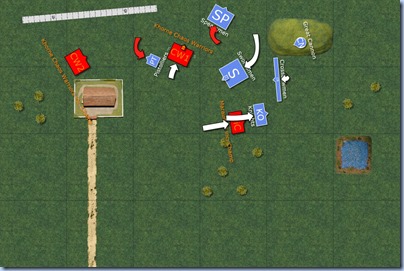
WC – Below is the report extracted from Battle Chronicler. I apologise in advance for complete unfamiliarity with the program so any feedback and tips would be much appreciated! Simius Sapiens’ (SiS) and Little Cheeky Monkey’s (LCM) comments for their respective turns are shown below the map for that turn. Technical hitches aside you should be able to click on the maps to get a full size view, fingers crossed! The tale begins with the deployment below…
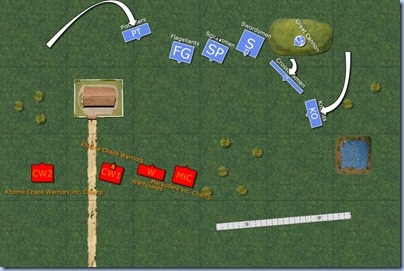
SiS - The terrain suggested that the wild onslaught would come up 2 obvious channels: between the trees and the pond, or between the trees and the farmhouse. Fortunately I managed to win the choice of table edge, and slapped the Cannon on the hill overlooking the Crossbowmen. The cannon had a view over both channels and the crossbowmen were placed to pick off the charge past the pond (how heroic!). I put my small unit of Knights to their left to help out as it was highly likely the crossbowmen would get overrun if a unit of Chaos Warriors were charging up that channel. The rest or the army would naturally line up to the right of the hill. The Flagellants were placed further forward to invite the charge past the farmhouse (this is starting to sound like something out of Animal Farm, how apt!). The Pistoliers were positioned out on the far right so they could nip between the farm and bother the Chaotic's from the rear.
LCM - The terrain wasn't looking so nice for me, with 2 obvious killing fields overlooked by a hill. Sims may be ancient but it'd be a dark miracle if there wasn't a cannon on that hill. Naturally I placed my Chaos Warriors as far away from the hill as possible. One with the intention of sweeping past the left of the farmhouse, and the General’s unit to cut the other the side. The presence of my Hero in this unit would provide his Leadership to the fragile Warhounds and the Marauders, who's job was to act as a human shield. If everything went to plan I'd be crushing the Empire under my mailed fist by teatime.
LCM - CHARGE!
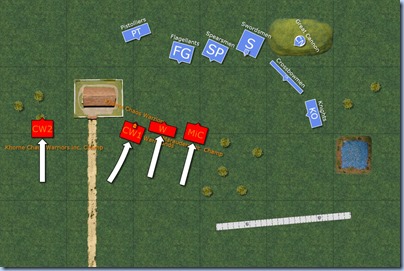
SiS - So the heroic charge past the duck pond was ignored. However a rather exciting charge past the farm was building momentum after my nephew's first turn. Piling the force on the right meant my Pistoliers were looking rather nervously at a frenzied unit of Chaos Warriors, gulp. The original plan to sneak around the back was right out of the window now so I moved them over to hopefully pepper the Chaos General's unit before they charged. My ignorance of the new rules meant I'd placed my Crossbowmen out in a thin line rather than in 2 ranks. In my day only the front rank could fire, however this broader front meant the Marauders were in arc of vision without them having to also turn around. However when bending down to get a model's eye view I noticed that one of the trees obscured the view of almost half of my crossbowmen so they had to restrain themselves from letting rip and instead settled for repositioning to get a shot in next turn (and ducking). This meant I also had to jog my Knights forward. I was rather surprised to learn that there was no movement modifier for their full plate armour and shield. That would have cost me an inch in the old days (ooh err!). This seems rather ridiculous but then I don't make the rules, and it's to my benefit!
The final task was to unleash my cannon. Unfortunately, and I'm sure quite deliberately, the warhounds obscured the view of the General's Chaotics. However this provided an opportunity to cause maximum carnage, assuming I managed to guess the distance and get lucky with this new fangled artillery dice (we didn't have those in my blah, blah, blah...). Taking into account the approximate distances between the armies when they set up, and the extent of my own disposition, followed by a canny bit of Pythagoras on my calculator I declared I was going to fire 36". My cheeky little cousin found this all rather amusing and informed me that I just had to mark where I wanted to drop the ball! As it happens this was just as well as my calculations appeared to have gone awry somewhere down the line and I'd have seen the cannon ball fly harmlessly over the top of the Chaos Warriors. Humph! I dropped the cannonball just short of the warhounds and watched as I managed to roll just enough to cut through 2 of them before landing at the feet of one of the Chaos Warriors, who I expect said a little prayer to his terrible god. The Warhounds passed their Ld test so that was that for the turn.
LCM - Well that could have been worse! Still Uncle Sims managed to make it entertaining by getting his calculator out for firing his cannon, and then completely misjudging the distance, bless him! The left flank continued their marathon march reaching the trees. I was starting to get the impression that they were going to achieve absolutely nothing but there was precious little else for them to do. The rest of the army trudged forward. There was the enticing prospect of charging the Flagellants next turn, which from the game's point of view wasn't great, but from Khorne's point of view would be a fantastic bloodfest as I cut those fanatical madmen down.
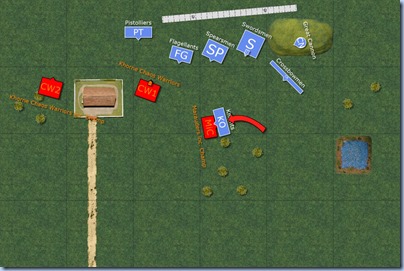
SiS - Unsurprisingly the relentless surge forward continued. My second minor botch up occurred when I realised that the Chaos Warriors were too far away for the pistoliers to shoot them this turn. Maybe next turn! I was briefly tempted to move forward to be sure to get a shot away this turn, but knowing my luck I'd probably end up in charge range of them and get cut to pieces so I refrained from any movement there this turn. The Knights moved forward with the intent to charge forward next turn into the juicy flank of the Marauders. Firstly though a bit of crossbow fire. Inevitably as I lined up the Marauders I found that they were 16" away from the crossbowmen so I'd miss out on the bonus of shooting at half range, which proved vital, tut. Meanwhile the cannonball managed to overshoot the Chaos Hounds before ploughing into the Chaos Warriors. Miraculously of the 3 struck, only one was wounded! My plan of cutting the Chaos horde down to size as they charged across the table was running out of time!
LCM - Well it was slightly difficult to hide my smirk after that. Yes the Knights were set up for a nasty charge into the flank of my Marauders but that could easily be avoided, with the remainder of his army powerless to quickly come to the Knights assistance. Anyway first thing first was to continue the depressingly slow flanking manoeuvre from the 2nd Chaos Warrior unit. The General's unit was clearly too far away to charge still but they would be in range of a charge from the Flagellants next turn. I decided to charge the warhounds into the Flagellants as their missile screening duties were pretty much complete and they had little else to do. The Marauders wheeled to face the Knights. This left them vulnerable to the flank but their main threat was the Knights after all and they'd distract attention from the Chaos Warriors. Now the carnage was to begin.
SiS - So having finished his moving my little cheeky nephew asked me to sort out my Flagellants. I was blissfully sitting back and relaxed so I was slightly perplexed. I pulled out the rulebook to see what he was talking about. Oh the "End is Nigh". Humph. Still nothing actually happened as a result of this so I was disturbed for nothing.
LCM - Poor old Uncle Sims wasn't aware of the tinkering the Flagellants had experienced in the 8th edition so that was a brief interlude, which didn't actually have an end product. There'd been a disappointing lack of blood for the Blood God so far! The Warhounds managed to get us going in the right direction savaging 3 of the Flagellants. However unfortunately the crazies wiped out my poor little doggies with their flails.
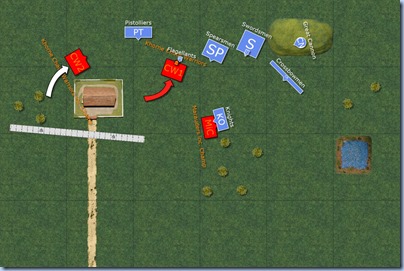
SiS - Well approaching the midpoint of the battle and it seemed that things weren't going that badly, in that I'd managed not to fight any Chaos Warriors yet. I was slightly tempted to attempt to tie them up with a charge from the Flagellants, but I decided discretion was the better part of valour and sat back and waited for the inevitable, as this would give me an extra turn to unleash all my missile troops at them. The Marauders were a different matter however. I fancied a nice charge from the Knights should be enough to see them off so I went to it!
The Cannon struck again, along with my bad fortune as 2 of the 4 Chaos Warriors hit managed not to be wounded! The crossbowmen contrived to kill nobody, and the pistoliers failed to manage 1 hit from 10 shots! I suppose given how this was panning out I was glad the Flagellants didn't charge and get cut to pieces.... Still someone found this all highly amusing as I poured dice ineffectually at them.
So on to the Knights, and a bit of a shock for me. I'd not really been concentrating when the Warhounds fought the Flagellants. The Warhounds charged, attacked and I fought back. However as I readied to nail the Marauders my cheeky little nephew stopped me and revealed 3 important facts:
1) Just because my Knights charged in their inferior Initiative meant I'd attack second. What they were doing with an I less than a warrior who cost 4 points. Oh the injustice. But then it got worse...
2) My cheeky little nephew rolled a load of dice for his second rank as well. While in the cold light of day after the game this makes sense I suppose, I was quite annoyed at the time. Still serves me right for not really reading the rulebook I suppose!
3) Oh yes the third fact was the Marauders having a higher initiative, but that got a bit caught up in the charge. It was still annoying enough to warrant it's own separate entry I thought!
Still in keeping with the rest of the game the Marauders failed to kill anyone, with only 2 wounds requiring saving. By contrast the heroic charge managed to kill 3 of the wild warriors from the north, including the champion. The Knights won the combat 4-1. I thought it was actually 4-2 but I was "schooled" by my little simian nephew that ranks now needed to be 5 models wide not 4 as I'd vaguely remembered. Whatever next! Well whatever next was the steadfast rule which meant despite my heroic and crushing charge the fact that the Marauders had an extra complete rank, to my none, meant that they used their unmodified leadership rather than the depleted version. Rolling the inevitable 6, presumably just to spite me, the Marauders held their ground.
LCM - Poor old Uncle Sims. Between ineffectual shooting and unfamiliar rules the last turn didn't go so well for him. For my part the inevitable trudging around the farmhouse was the first order of business for my 2nd Chaos Warriors. Between the likelihood of Sim's pistoliers simply running away and the General's CWs wiping out the Flagellants I would be highly surprised if they were going to achieve anything by the end of the day, humph. In the middle however the excitement was beginning. The General's Chaos Warriors charged into the Flags. Amusingly 2 of them killed themselves, correctly predicting that the end was nigh. Fortunately this only drove them into a Fanatical Fury, so they'd only reroll missed hits, rather than gain extra toughness. This scarcely mattered though as the fell frenzied halberds of the Warriors hacked down 14 of the Empire loonies, leaving one who was incapable of fighting back, but also of breaking. Would giving the General an extra hand weapon have been sufficient to finish them off given he's already strength 5? Well maybe but I prefer having the halberd for those extra tough opponents.
The Marauders managed to kill one of the Knights, who in turn managed to kill 2 of my men in return. The combat ended in a tie.
SiS - Well the Flagellant's survival at least held up the Chaos Warriors briefly. The awesome display of slaughter was rather off putting and I'm fairly sure neither the Spearmen or Swordsmen fancied having a go at the Chaos Warriors. Certainly in real life I wouldn't send troops in without an expectation of them surviving. However in real life we were supposed to be defending a town, which would be put to the sword along with us if we just dropped our weapons and fled as fast as our little legs could carry us. So with this rather stark example of Hobson's Choice presented to them the Spearmen charged the Chaos Warriors and the Swordsmen manoeuvred to hopefully charge them in the flank (LCM - fat chance!). The pistoliers, in a fine example of solidarity (or foolishness given that on their horses they'd be over the hills and far away given half a chance!) charged the flank of the General's Chaos Warriors.
As a prelude to the inevitable disappointment of the rest of the turn the cannon managed to kill 2 of the Chaos Warriors who'd only just turned the corner of the farm.
Firstly the simple battle between the Marauders (I4 indeed!) and the Knights kicked off, although no one managed to kill anybody so it kicked off a bit like a scuffle in a pub on a Friday night. This was too much for the Knights and they broke due to the Marauders rank bonus. Fortunately despite the Marauders having a superior initiative they didn't see this coming and the mounted Knights managed to out run them.
The main combat started with the General slaying the remaining Flagellant twice! 2 spearmen were killed, while 3 pistoliers bought it. Not quite the carnage I was expecting. However in the following 5 minutes it took to work out exactly how to establish the combat result, it quickly became apparent that my flank charge wasn't enough to "disrupt" the Chaos Warriors rank bonus (which is only fair I suppose, it's not as if it actually bothered them as all!). Anyway the upshot was the empire had been well beaten 9-5. This was quite enough for the Pistoliers, who hadn't been keen on attacking in the first place and they fled a mammoth 3"! The skittish Spearmen showed them how it was done, sprinting 9” and showing the pursuing Chaos Warriors a clean pair of heels. Given their proximity to the edge of the table, and the tempting rear (ooh err) being presented to the Chaos Warriors, I fully anticipated not seeing them when my next move came around. The final insult would have been the Swordsmen fleeing but they bravely decided to stick around while the world collapsed around them.
LCM - Well that combat phase may have had less bloodshed, but it seemed to have fairly decisively turned the tables in Khorne's favour. The General's Chaos Warriors were faced with the pasty rumps of the Spearmen and charged forward wiping them out. Similarly the Marauders were only 4" off the Knights so it would have been rude not to charge and they wiped out their heavily armoured foes. Lastly the Chaos Warriors couldn't resist attempting to charge the Pistoliers. However they fell 2" short so bumbled forward even more slowly than they had previously!
SiS - Oh dear. Well on the bright side the 2 surviving Pistoliers hadn't been wiped out yet. I reformed the Swordsmen to charge the Marauders and readied the Cannon to attempt to assassinate the Chaos General.
Finally the Crossbowmen managed something, cutting down 4 Marauders. The Pistoliers continued their feeble performance failing to kill any of the frenzied Warriors facing them. However this poor luck didn't completely carry to the Cannon which managed to scythe the ball through the Warriors, hitting 5, including the general, but only killing 3 thanks to the Look Out Sir rule.
LCM - Well the General's Chaos Warriors were pretty much useless so they turned to face the Cannon, no need to provide a deep formation to it. However it occurred to me that there was no need for the General to remain idle so I charged him off into the rear of the Swordsmen. The Marauders decided that this distraction would provide them with an opportunity to take revenge on the Crossbowmen so they charged into them, or at least half of them.
My General decided that being a pain in the behind wasn't sufficient mischief and challenged the Empire General, who was rather reluctantly pushed to the front by his men, in the hope that they could use his leadership in the inevitable break test. Fortunately his sacrifice was not in vain as although the Swordsmen lost the combat they managed not to break.
Lastly the Chaos Warriors over by the Pistoliers finally managed to get into combat. The Pistoliers stood and shot ineffectually before being cut to pieces.
SiS - Hmm, well not much left to do here unfortunately. The Crossbowmen failed to rally and galloped off as fast as they could. The Cannon's ball failed to bounce. The last act in this farce was the Swordsmen managing to put up a bit of a fight with the General, parrying 2 of his killing blows and restricting the fatalities to 2, while managing 2 wounds of their own, which were turned by his vile Chaotic Armour. The rank bonus and Standard meant the Swordsmen actually won the combat 4-2, which saw the fickle General flee! Presumably to the safety of one of the Chaos Warrior units at large on the battlefield. An unexpected high point to finish a disappointing battle.
The Report is Copyright (c) 2009 Simius Sapiens. All rights reserved.
The Report by Simius Sapiens is licensed under a Creative Commons Attribution-Non-Commercial-No Derivative Works 3.0 Unported License.
This document is completely unofficial and in no way endorsed by Games Workshop Limited. Chaos, the Chaos device, the Chaos logo, Citadel, Citadel Device, Darkblade, the Double-Headed/Imperial Eagle device, 'Eavy Metal, Forge World, Games Workshop, Games Workshop logo, Golden Demon, Great Unclean One, GW, the Hammer of Sigmar logo, Horned Rat logo, Keeper of Secrets, Khemri, Khorne, the Khorne logo, Lord of Change, Nurgle, the Nurgle logo, Skaven, the Skaven symbol devices, Slaanesh, the Slaanesh logo, Tomb Kings, Trio of Warriors, Twin Tailed Comet Logo, Tzeentch, the Tzeentch logo, Warhammer, Warhammer Online, Warhammer World logo, White Dwarf, the White Dwarf logo, and all associated marks, names, races, race insignia, characters, vehicles, locations, units, illustrations and images from the Warhammer world are either (r), TM and/or (c) Copyright Games Workshop Ltd 2000-2007, variably registered in the UK and other countries around the world. Used without permission. No challenge to their status intended. All Rights Reserved to their respective owners.
Component (c) Tom Wright 2009. All rights reserved.
Component by Tom Wright is licensed under a Creative Commons Attribution-Non-Commercial-Share Alike 3.0 Unported License.
Component (c) Tom Wright 2010. All rights reserved.
Component by Tom Wright is licensed under a Creative Commons Attribution-Non-Commercial-Share Alike 3.0 Unported License.
Component (c) 2010 Gerry Elliott. All rights reserved.
Component by Gerry Elliott is licensed under a Creative Commons Attribution-Non-Commercial-Share Alike 3.0 Unported License.
Image (c) CGTextures 2009. One or more textures on this image have been created with images from CGTextures.com. These images may not be redistributed by default, please visit www.cgtextures.com for more information.
Component (c) 2009 Marijn Bierhof. All rights reserved.
Component (c) Aaron Port 2009. All rights reserved.
Battle Chronicler Component by Aaron Port is licensed under a Creative Commons Attribution-Non-Commercial-Share Alike 3.0 Unported License.
Built with Battle Chronicler






No comments:
Post a Comment